Creating a Merit Badge
Step 1 - Right click and copy the thread pattern below.
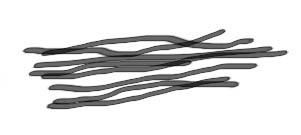
Open photoshop and create a new document that is 3 inches by 3 inches, 150 dpi.
Paste thread pattern.
Chose Edit, Define brush preset to create a thread brush.
Step 2 - Right click and copy the badge pattern below.
Paste thread pattern.
Chose Edit, Define brush preset to create a thread brush.
Step 2 - Right click and copy the badge pattern below.

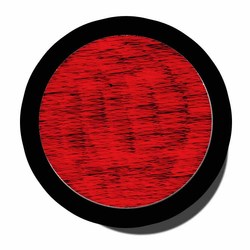
Step 3 - Open photoshop and create a new document that is 5 inches by 5 inches, 150 dpi
Paste badge pattern.
Step 4 - Use the magic wand tool to select the middle of the badge and press delete.
Step 5 - Add 2 layers - Layer new Layer, Layer new Layer. Make sure that your layers palette is open:
Window - Layers
Step 6 - Drag your badge layer to the top of the layers palette. It should be badge layer, layer, layer.
Fill the bottom layer with black. select the paint bucket and set the color for black.
Step 7 - Choose brush, and scroll down to the bottom of the list and choose the thread brush, size 120.
Choose a color other than black. Paint the second layer with the color, letting some black show through, to add threads to the background of the badge.
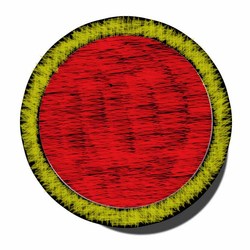
Step 8 - Add a new layer on top of the badge layer - Layer new Layer. Choose brush, and scroll down to the bottom
of the list and choose the thread brush, size 67. Add threads to the edges of the badge.
Open the brushes window - Window brushes, and select Brush Tip Shape.
Use the arrow to rotate the brush as you add threads to the edge of the badge.
Use the eraser tool if you paint outside the edge. Save your work as Art Badge your initials.
Ex. Art Badge TT.psd
Step 9 - Right Click and copy the image of the Artist Palette.

Step 10 - Add a new layer, and paste the Artist Palette. Use the magic wand and the shift key to select each part of the palette.
Step 11 - Add a new layer. Select the new layer and paint white threads on top of the palette. If you palette is still selected, the threads will only paint on top of the palette.
Step 13 - With the white thread layer selected - go to Layer, Layer style and choose Bevel and Emboss. This will make the thread look more 3-D.
Save your finished project.
Step 14 - Create another badge, following the steps, using different colors and a different center image, that is school appropriate. Ex. Patriots logo.
Essential Question: How can my art skills be used to find a job in Commercial Art or Business?
